Pastel Patchwork Wall Decal Stickers - Pink Stars

$ 32.50

Create a pretty pastel wall with our cute Pastel Patchwork range of decals!

Mix and match the designs to create the perfect look for your room!

"My daughter hasn't stopped pointing and saying 'pretty' since I stuck up your stickers last night. Thank you again." - Joanna

Our gorgeous decals will transform that plain boring wall into a beautiful feature wall in as little at 15 minutes! Giving your room the WOW factor you are looking for.

  • Quick to apply! "Totally transformed the room in about 10 minutes. Brilliant idea." - Emma
  • Instant WOW factor! "Our littlest lady is loving her decals from Kasie's room … makes a lovely feature wall in her room." - Nuala
  • Easy to use! "…they have completely transformed our little girls room and she loved helping to stick them on!" - Alice

No mess. No paint. No wallpaper. Just peel and stick!

Decals are the quickest and easiest way to get an eye catching feature wall for any room of your house, even the bathroom!

They can be styled in so many ways and are easy to move and reapply until you get exactly the look you are after! No more need for expensive wallpaper or the mess and the hassle of installing it!

Create a fresh new look for any style and season!

Put them up and don't like how they look? Just peel them off again! No risk of spending hours painstakingly hand painting or stenciling a design only to decided you don't like it and have to repaint it.

Or you spend all that time, money and energy and 3 months later your child (or you!) wants something new. Just peel them off*, give the wall a quick wipe down and it's ready for you to create a stunning new look!

  • Made from non-toxic PVC.
  • Waterproof, so you can still clean the walls.
  • Easy to apply on most smooth, clean surfaces.
  • Can be re-positioned till you get the look you want.*

⭐⭐⭐⭐⭐
"I love this wall stickers! They have completely transformed our little girls room and she loved helping to stick them on! Brilliant quality and fast postage. Took about a week and I live in the UK! Fantastic product, highly recommend Kasie’s Room! - Alice"

Note: Room images are an example only may not be to scale. See 'Size' tab for exact measurements.

*Please read application & removal instructions to ensure the product is right for you.

Pastel Patchwork Wall Decal Stickers - Pink Stars

Price includes 6 identical sheets.

This decal comes on a transparent background and needs to be applied to a white/cream background to stand out.  


Surface Type & Preparation:

  • A smooth, clean, dry painted surface is best.
  • You must clean the walls with a mild cleaning product to remove dust and oils. Sugar Soap or even dish detergent are options.
  • Ensure there is no cleaning residue on the walls by thoroughly wiping them with a clean damp cloth. Rinse cloth frequently in clean water.
  • Leave for 1-2 hours to ensure no moisture is left on the wall. 
  • We recommend flattening the product before sticking it to the wall for ease of application and to create a wrinkle-free finish.

It is also recommended that you first test the application and removal in an inconspicuous section of the wall in case the surface is not compatible with being able to adjust them.

We suggest cutting out a piece from the edge that does not include any of the design and using this to test, it is the same material as the design and you don't risk damaging the design. 

Freshly Painted Walls:

DO NOT apply to a newly painted wall!

  • A freshly painted wall needs time to cure before applying decals.
  • Most newly painted walls need 8+ weeks to cure.
  • Follow the paint manufacturers recommendation for how long their product takes to cure and remember that the thickness and number of coats of paint, as well as the temperature and humidity levels, will affect this process.
  • Decals will not stick to a freshly painted wall and may remove the paint or leave a residue when you attempt to move them. 
  • We suggest if the wall has been painted in the last 3 months that you test it first by using some of the excess from around the outside of the decal. Apply a section to the wall in an unobtrusive spot and leave it 48 hours, if it has not lifted or peeled off the wall then your wall has cured enough to apply the decal. 

Wallpaper:

They are not recommended to be used on wallpaper.

If you have a smooth paper finish wallpaper the decals should stick but they will tear the paper if you attempt to remove them.

Decals will most likely not stick to shiny or textured wallpapers.

Application Instructions:

Please read all information above before applying. 

To safely transport them decals come tightly rolled. We recommend flattening the product before sticking it to the wall for ease of application and to create a wrinkle-free finish.

  • Plan out your design.
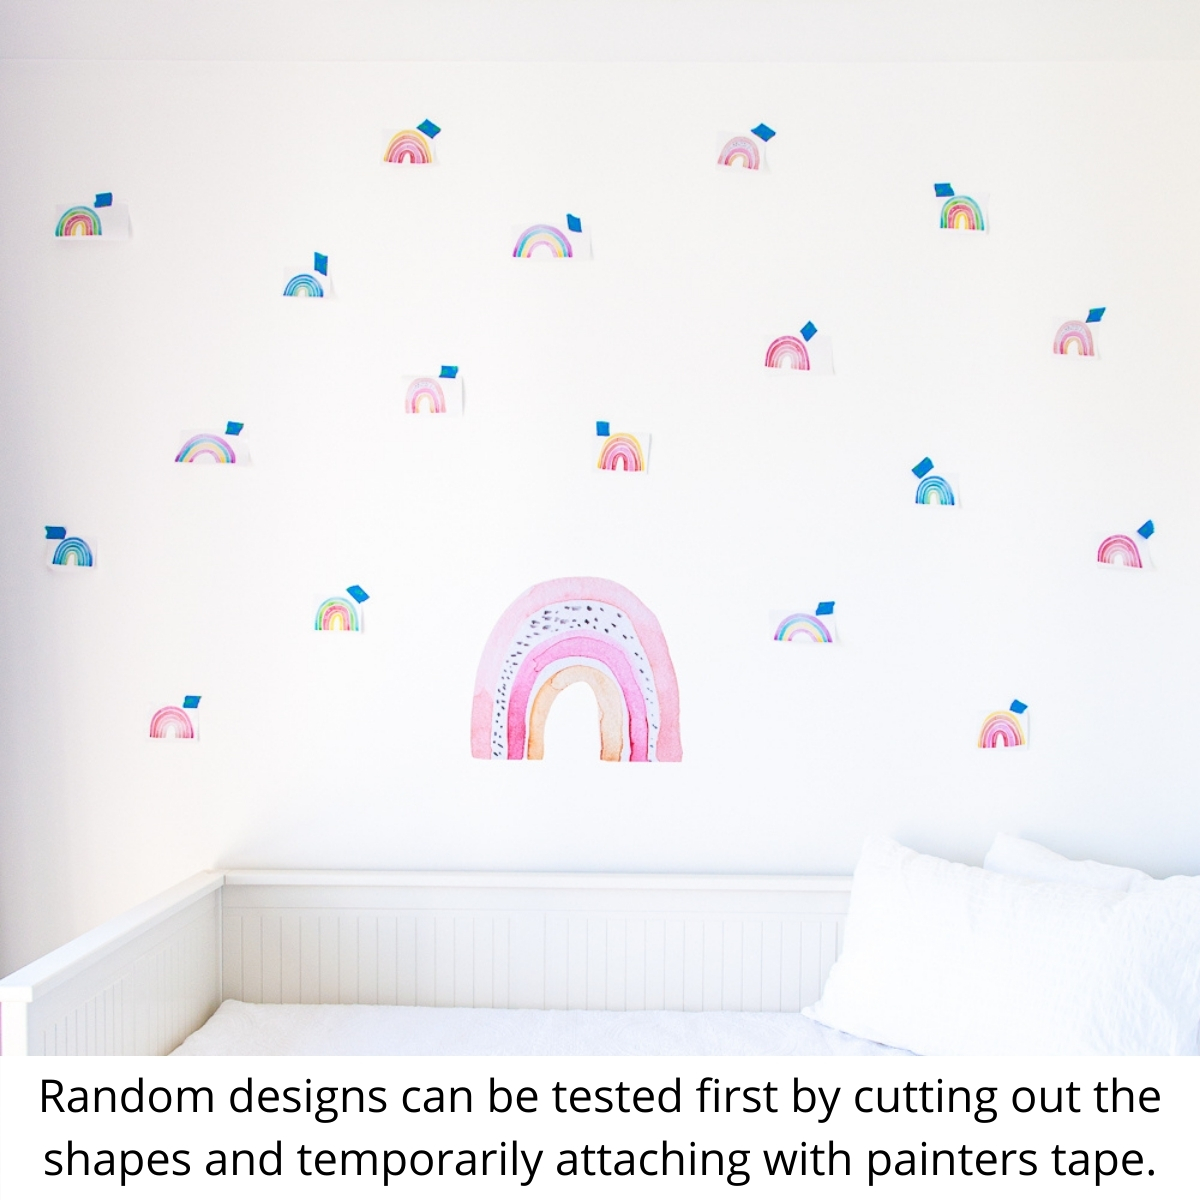
  • If using larger decals we suggest separating them (leaving them on their backing) then, using painters tape, tack them onto the wall until they are positioned in a way you are happy with (see example at bottom of "How Many Do I Need" tab).
  • Peel small decals off backing and lightly apply to wall.
  • Large decals - loosen 1 side and apply to wall, then slowly peel backing off as you apply and smooth onto the wall. 
  • Once all decals are correctly placed and you are happy with the look go over them and firmly, but gently, rub to adhere them properly to the wall. A cloth is good for this.

WARNING: Take care that decal does not fold and stick to itself as it is very hard to separate without damage.

Large Decals:

Please note: Larger decals are best only applied once so please take extra care that they are accurately positioned before applying. 

  • For ease of application ensure decal is flat before applying to wall. 
  • If there are different parts to the decal cut them all out to give smaller pieces to work with.
  • Do not peel entire decal off backing.
  • Loosen 1 side and apply to wall, then slowly peel backing off as you apply and smooth onto the wall. 
  • We also advise having a second person on hand to assist. 

Note:

Our decals are very reliable, however we can not guarantee they will adhere to every surface, even when it is smooth and clean.

If you are having issues with your decals not sticking and have followed all of the above instructions please contact us and we will do our best to resolve the issue. 

Removal:

Our decals are designed to be removable but the quality and type of surface they are applied to will greatly effect whether they can be removed without damaging the wall.

It is recommended that you first test the application and removal in an inconspicuous section of the wall in case the surface is not compatible with being able to adjust them. The inside of a wardrobe is ideal.

If you feel any resistance when attempting to lift the decal please see our removal instructions. 

*We do not guarantee they will not damage the surface when removed and take no responsibility if the wall surface is damaged.

Removal Tips:

When removing decals do it slowly and gently and please take your time and be patient and you should be able to remove with minimal issues or marks to the wall*. 

  • Get a hairdryer and set to a low heat. Beginning at the edge of the decal, point your hairdryer at the wall holding it about 10-20cm away from the decal. Once the decal feels warm to the touch turn off the dryer. 
  • Do not allow the decal to get too hot or the glue will melt making removal harder and leaving residue on the wall.
  • Carefully get under an edge with your nail or a plastic scraper and peel the sticker back on itself. Don't attempt to pull up.
  • If there is resistance and the decal is not easily coming off re-apply the heat source and repeat the first step. 
  • If there is residue wipe with a damp cloth or mild cleaning product.
  • Eucalyptus oil or solvent can be used to remove any residue that will not come off with the above method. NOTE: Anything used on a wall should be tested in an inconspicuous place first.

*We do not guarantee they will not damage the surface when removed and take no responsibility if the wall surface is damaged.

Warning Decal stickers are designed for decoration only and are not to be considered as a toy. Please ensure that they are out of reach of children under 3 years of age, especially children in a cot, crib or bed to avoid a possible choking hazard.

No mess. No paint. No wallpaper. Just peel and stick!

Our decals are made from non-toxic PVC - providing a waterproof finish so you can still easily clean the walls.

The adhesive glue backing is strong enough to stick to most smooth clean surfaces and is designed so the product can be easily adjusted and removable*.

We recommend flattening the product before sticking it to the wall for ease of application and to create a wrinkle-free finish.

If purchasing this product as a gift please provide the recipient with the full Application & Removal instruction so they can asses if the product is right for them and how they need to use it to ensure they get the best results. 

*See our 'Application and Removal Instructions' to check that the product is right for your surface. 

NOTE: Room images are an example only may not be to scale. See 'Size' tab for exact measurements. 


Choose your look

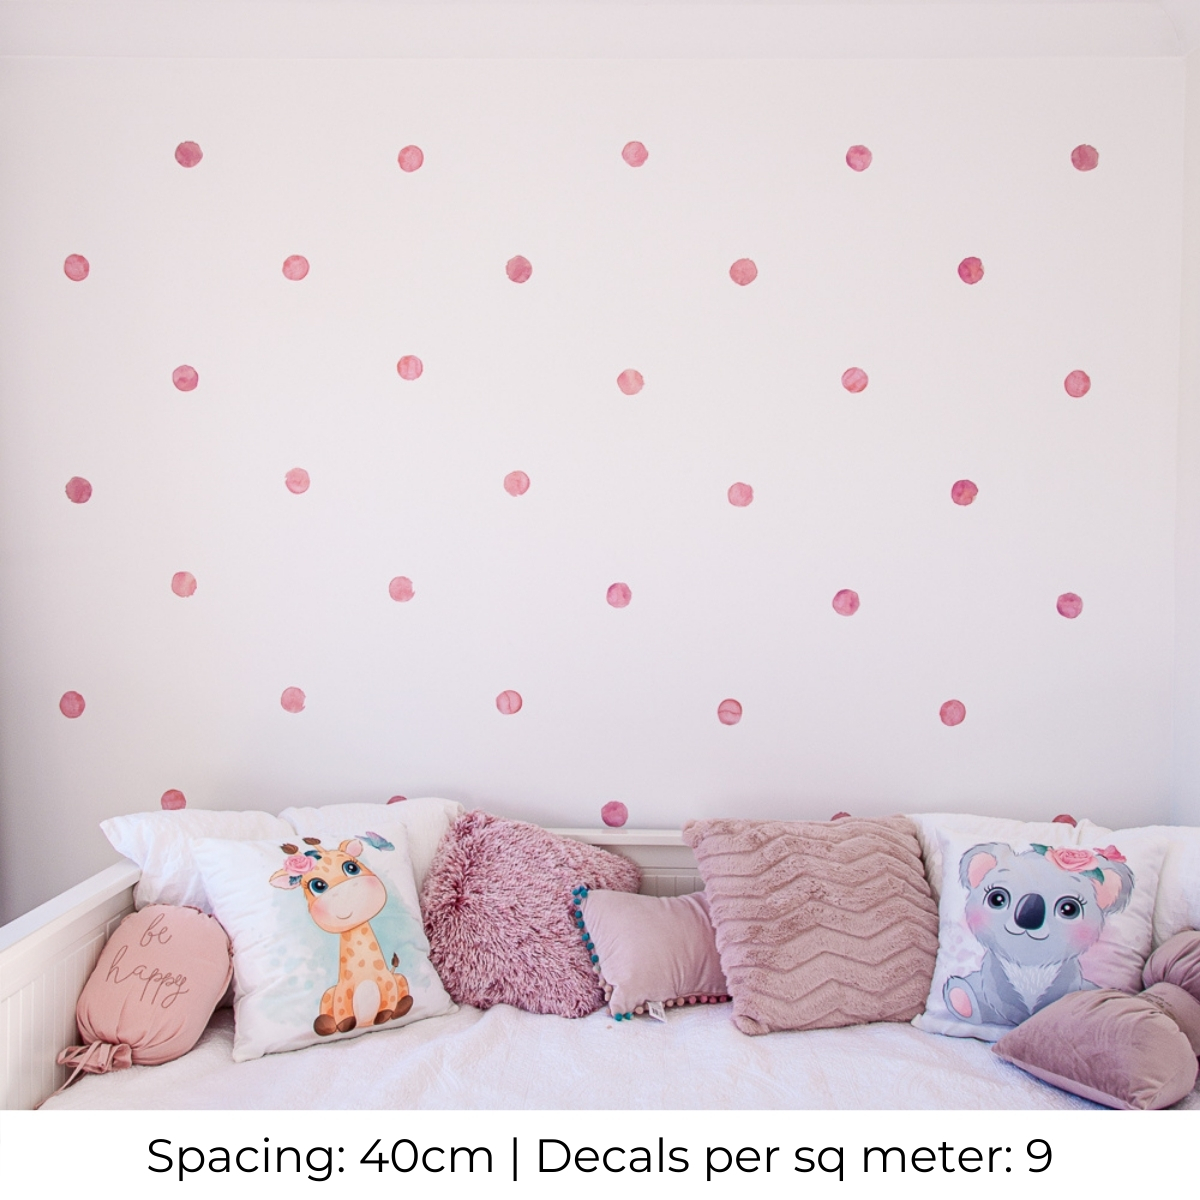
The hardest part of applying our decals is deciding what design you love the most! We have put together a few of the most popular spacing's to help give you inspiration and guidance to create your own special room. 

Uniform Designs:

To create a uniform look you will need

  • To carefully calculate the number of decals needed to ensure you can complete your look you will need a template.
  • When going for a uniform design it is better to have a few decals left over than not enough and have to wait for more to arrive before you can finish your look!
  • Allow 30-60 minutes to complete these looks on a 2.3m x 3.5m wall. 

We hope these designs will help inspire you!

Example of Template:


Example of Template:


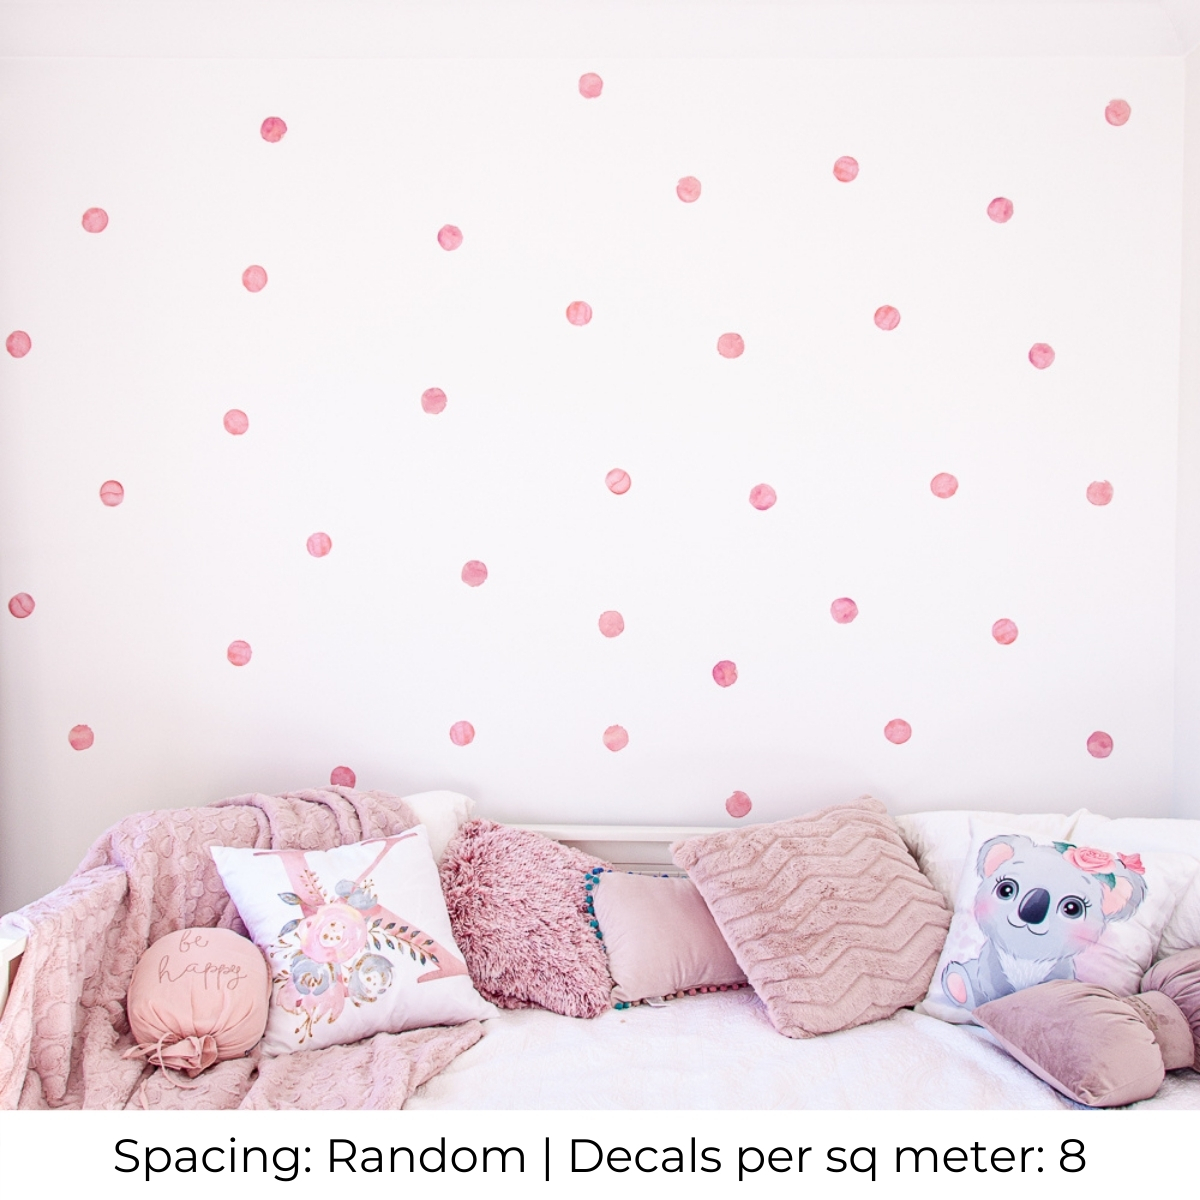
Random Designs:

To create a random design.

  • Any number of decals can be used.
  • Do not press the decals firmly down until you are happy with the placement.
  • Allow 15-60 minutes to do a 2.3m x 3.5m wall. 


Complex shaped decals and designs:

When you have more specialised decals or larger decals it is best to plan where you want them to go before you start sticking them to the wall as there is a greater chance of damaging them if you attempt to move them.

  • Leave the decal on its backing and separating all the designs by cutting around them but leaving as much backing paper as possible.
  • Use a high quality painters tape to tack the pieces to the wall.
  • Adjust the design till you are happy with the placement.
  • Once you are happy go through and peel them off the backing and attach to the wall.


For more inspiration check out our Shop the Look. Also the review photos from our 100's of happy customers.

WARNING - For decorative purposes only, not a toy. Not suitable for children under 3 years due to strangulation and choking risk. Keep out of reach of small children at all times. Keep away from flames. 

Create a pretty pastel wall with our cute Pastel Patchwork range of decals!

Mix and match the designs to create the perfect look for your room!

"My daughter hasn't stopped pointing and saying 'pretty' since I stuck up your stickers last night. Thank you again." - Joanna

Our gorgeous decals will transform that plain boring wall into a beautiful feature wall in as little at 15 minutes! Giving your room the WOW factor you are looking for.

  • Quick to apply! "Totally transformed the room in about 10 minutes. Brilliant idea." - Emma
  • Instant WOW factor! "Our littlest lady is loving her decals from Kasie's room … makes a lovely feature wall in her room." - Nuala
  • Easy to use! "…they have completely transformed our little girls room and she loved helping to stick them on!" - Alice

No mess. No paint. No wallpaper. Just peel and stick!

Decals are the quickest and easiest way to get an eye catching feature wall for any room of your house, even the bathroom!

They can be styled in so many ways and are easy to move and reapply until you get exactly the look you are after! No more need for expensive wallpaper or the mess and the hassle of installing it!

Create a fresh new look for any style and season!

Put them up and don't like how they look? Just peel them off again! No risk of spending hours painstakingly hand painting or stenciling a design only to decided you don't like it and have to repaint it.

Or you spend all that time, money and energy and 3 months later your child (or you!) wants something new. Just peel them off*, give the wall a quick wipe down and it's ready for you to create a stunning new look!

  • Made from non-toxic PVC.
  • Waterproof, so you can still clean the walls.
  • Easy to apply on most smooth, clean surfaces.
  • Can be re-positioned till you get the look you want.*

⭐⭐⭐⭐⭐
"I love this wall stickers! They have completely transformed our little girls room and she loved helping to stick them on! Brilliant quality and fast postage. Took about a week and I live in the UK! Fantastic product, highly recommend Kasie’s Room! - Alice"

Note: Room images are an example only may not be to scale. See 'Size' tab for exact measurements.

*Please read application & removal instructions to ensure the product is right for you.

Pastel Patchwork Wall Decal Stickers - Pink Stars

Price includes 6 identical sheets.

This decal comes on a transparent background and needs to be applied to a white/cream background to stand out.  


Surface Type & Preparation:

  • A smooth, clean, dry painted surface is best.
  • You must clean the walls with a mild cleaning product to remove dust and oils. Sugar Soap or even dish detergent are options.
  • Ensure there is no cleaning residue on the walls by thoroughly wiping them with a clean damp cloth. Rinse cloth frequently in clean water.
  • Leave for 1-2 hours to ensure no moisture is left on the wall. 
  • We recommend flattening the product before sticking it to the wall for ease of application and to create a wrinkle-free finish.

It is also recommended that you first test the application and removal in an inconspicuous section of the wall in case the surface is not compatible with being able to adjust them.

We suggest cutting out a piece from the edge that does not include any of the design and using this to test, it is the same material as the design and you don't risk damaging the design. 

Freshly Painted Walls:

DO NOT apply to a newly painted wall!

  • A freshly painted wall needs time to cure before applying decals.
  • Most newly painted walls need 8+ weeks to cure.
  • Follow the paint manufacturers recommendation for how long their product takes to cure and remember that the thickness and number of coats of paint, as well as the temperature and humidity levels, will affect this process.
  • Decals will not stick to a freshly painted wall and may remove the paint or leave a residue when you attempt to move them. 
  • We suggest if the wall has been painted in the last 3 months that you test it first by using some of the excess from around the outside of the decal. Apply a section to the wall in an unobtrusive spot and leave it 48 hours, if it has not lifted or peeled off the wall then your wall has cured enough to apply the decal. 

Wallpaper:

They are not recommended to be used on wallpaper.

If you have a smooth paper finish wallpaper the decals should stick but they will tear the paper if you attempt to remove them.

Decals will most likely not stick to shiny or textured wallpapers.

Application Instructions:

Please read all information above before applying. 

To safely transport them decals come tightly rolled. We recommend flattening the product before sticking it to the wall for ease of application and to create a wrinkle-free finish.

  • Plan out your design.
  • If using larger decals we suggest separating them (leaving them on their backing) then, using painters tape, tack them onto the wall until they are positioned in a way you are happy with (see example at bottom of "How Many Do I Need" tab).
  • Peel small decals off backing and lightly apply to wall.
  • Large decals - loosen 1 side and apply to wall, then slowly peel backing off as you apply and smooth onto the wall. 
  • Once all decals are correctly placed and you are happy with the look go over them and firmly, but gently, rub to adhere them properly to the wall. A cloth is good for this.

WARNING: Take care that decal does not fold and stick to itself as it is very hard to separate without damage.

Large Decals:

Please note: Larger decals are best only applied once so please take extra care that they are accurately positioned before applying. 

  • For ease of application ensure decal is flat before applying to wall. 
  • If there are different parts to the decal cut them all out to give smaller pieces to work with.
  • Do not peel entire decal off backing.
  • Loosen 1 side and apply to wall, then slowly peel backing off as you apply and smooth onto the wall. 
  • We also advise having a second person on hand to assist. 

Note:

Our decals are very reliable, however we can not guarantee they will adhere to every surface, even when it is smooth and clean.

If you are having issues with your decals not sticking and have followed all of the above instructions please contact us and we will do our best to resolve the issue. 

Removal:

Our decals are designed to be removable but the quality and type of surface they are applied to will greatly effect whether they can be removed without damaging the wall.

It is recommended that you first test the application and removal in an inconspicuous section of the wall in case the surface is not compatible with being able to adjust them. The inside of a wardrobe is ideal.

If you feel any resistance when attempting to lift the decal please see our removal instructions. 

*We do not guarantee they will not damage the surface when removed and take no responsibility if the wall surface is damaged.

Removal Tips:

When removing decals do it slowly and gently and please take your time and be patient and you should be able to remove with minimal issues or marks to the wall*. 

  • Get a hairdryer and set to a low heat. Beginning at the edge of the decal, point your hairdryer at the wall holding it about 10-20cm away from the decal. Once the decal feels warm to the touch turn off the dryer. 
  • Do not allow the decal to get too hot or the glue will melt making removal harder and leaving residue on the wall.
  • Carefully get under an edge with your nail or a plastic scraper and peel the sticker back on itself. Don't attempt to pull up.
  • If there is resistance and the decal is not easily coming off re-apply the heat source and repeat the first step. 
  • If there is residue wipe with a damp cloth or mild cleaning product.
  • Eucalyptus oil or solvent can be used to remove any residue that will not come off with the above method. NOTE: Anything used on a wall should be tested in an inconspicuous place first.

*We do not guarantee they will not damage the surface when removed and take no responsibility if the wall surface is damaged.

Warning Decal stickers are designed for decoration only and are not to be considered as a toy. Please ensure that they are out of reach of children under 3 years of age, especially children in a cot, crib or bed to avoid a possible choking hazard.

No mess. No paint. No wallpaper. Just peel and stick!

Our decals are made from non-toxic PVC - providing a waterproof finish so you can still easily clean the walls.

The adhesive glue backing is strong enough to stick to most smooth clean surfaces and is designed so the product can be easily adjusted and removable*.

We recommend flattening the product before sticking it to the wall for ease of application and to create a wrinkle-free finish.

If purchasing this product as a gift please provide the recipient with the full Application & Removal instruction so they can asses if the product is right for them and how they need to use it to ensure they get the best results. 

*See our 'Application and Removal Instructions' to check that the product is right for your surface. 

NOTE: Room images are an example only may not be to scale. See 'Size' tab for exact measurements. 


Choose your look

The hardest part of applying our decals is deciding what design you love the most! We have put together a few of the most popular spacing's to help give you inspiration and guidance to create your own special room. 

Uniform Designs:

To create a uniform look you will need

  • To carefully calculate the number of decals needed to ensure you can complete your look you will need a template.
  • When going for a uniform design it is better to have a few decals left over than not enough and have to wait for more to arrive before you can finish your look!
  • Allow 30-60 minutes to complete these looks on a 2.3m x 3.5m wall. 

We hope these designs will help inspire you!

Example of Template:


Example of Template:


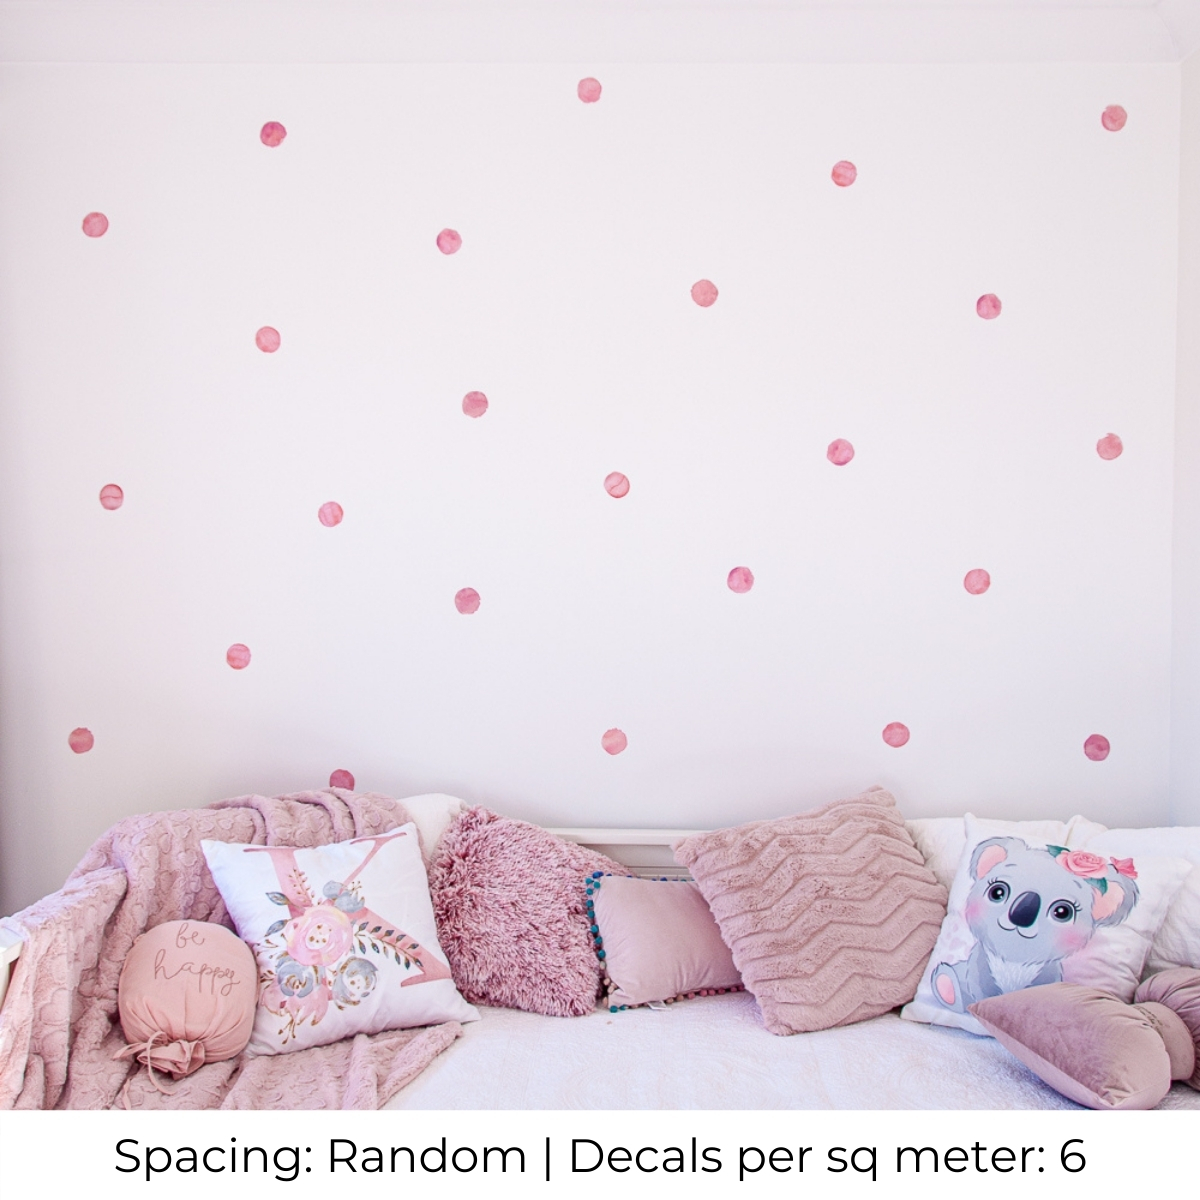
Random Designs:

To create a random design.

  • Any number of decals can be used.
  • Do not press the decals firmly down until you are happy with the placement.
  • Allow 15-60 minutes to do a 2.3m x 3.5m wall. 


Complex shaped decals and designs:

When you have more specialised decals or larger decals it is best to plan where you want them to go before you start sticking them to the wall as there is a greater chance of damaging them if you attempt to move them.

  • Leave the decal on its backing and separating all the designs by cutting around them but leaving as much backing paper as possible.
  • Use a high quality painters tape to tack the pieces to the wall.
  • Adjust the design till you are happy with the placement.
  • Once you are happy go through and peel them off the backing and attach to the wall.


For more inspiration check out our Shop the Look. Also the review photos from our 100's of happy customers.

WARNING - For decorative purposes only, not a toy. Not suitable for children under 3 years due to strangulation and choking risk. Keep out of reach of small children at all times. Keep away from flames.